Windows Virtual Desktop (WVD) was finally released to GA, so here’s your step-by-step guide to deploy Windows Virtual Desktop! For those of you that have been living under a rock (or spending time with your friends and families), WVD is Microsoft’s new Desktop-as-a-Service offering to provide Windows 10 virtual desktop infrastructure (VDI) in the Azure cloud for Windows 10 E3 / E5 subscribers.
Requirements for Deploying Windows Virtual Desktop in Azure
Here are a few prerequisites that you’ll need already configured in your lab before you start deploying Windows Virtual Desktop:
- An Azure CSP Subscription from Infused Innovations (or any Azure Subscription will work too)
- An empty resource group
- Update: WVD is generally available worldwide as of 9/30/2019
- An Azure Virtual Network that has access to your Active Directory (Boo-hiss! Support for Azure AD Join is not ready yet. Your instance needs to be domain joined or Hybrid Azure AD Joined.)
- One of the following licenses:
- Windows 10 E3 / E5
- Windows 10 A3 / A5 (Education Licenses)
- Microsoft 365 Business or F1 (WHAT?!)
- Microsoft 365 E3 / E5
- Licensing requirements appear to state that these are the only SKUs that will allow you to access WVD from a non-Windows 10 Professional device
- Luckily, you’re running Microsoft 365 E3 with Identity Threat Protection in a Zero Trust environment, right? RIGHT?!
- If you don’t own the proper licensing yet, you can compare all Microsoft 365 licensing options on our blog
Deploy Windows Virtual Desktop in Azure
Now for the fun part!
Consent to Deploy Windows Virtual Desktop
- Go to the WVD consent page and approve consent for both your Server and Client App:
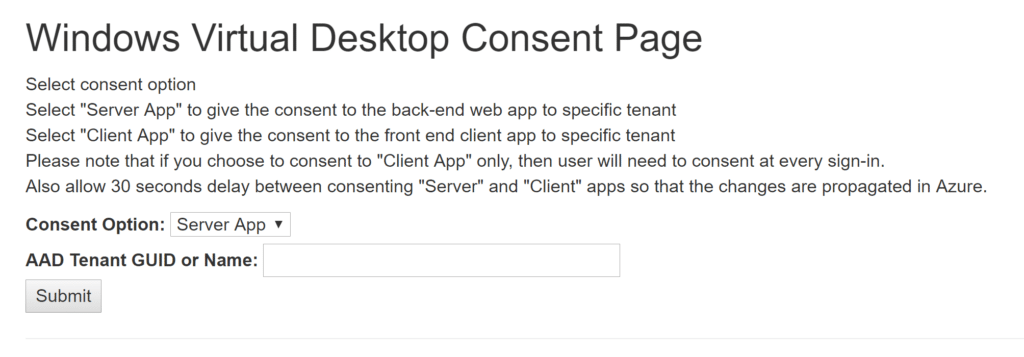
a. You’re doing this in a lab, so there’s no need to get approval from legal.
b. To lookup your AAD Tenant GUID, copy the Directory ID from this page: https://portal.azure.com/#blade/Microsoft_AAD_IAM/ActiveDirectoryMenuBlade/Properties
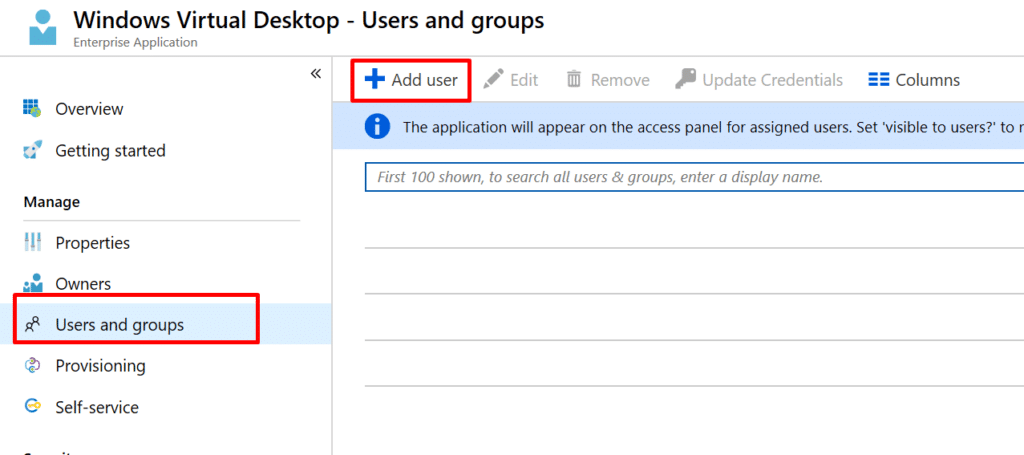
Configure Enterprise Application Administrators in Azure AD
- Go to this blade in the Azure Portal
https://portal.azure.com/#blade/Microsoft_AAD_IAM/StartboardApplicationsMenuBlade/AllApps/menuId/ - Search for deploy Windows Virtual Desktop and select it
- Select Users and Groups, then add everyone that you want to have access to WVD:
Deploy a Windows Virtual Desktop Tenant in PowerShell
- Open PowerShell as an administrator
- Run the following block of code:
Install-Module -Name Microsoft.RDInfra.RDPowerShell
Import-Module -Name Microsoft.RDInfra.RDPowerShell
Add-RdsAccount -DeploymentUrl "https://rdbroker.wvd.microsoft.com"
New-RdsTenant -Name <TenantName> -AadTenantId <DirectoryID> -AzureSubscriptionId <SubscriptionID>
The last line should look something like:
New-RdsTenant -Name ContosoWVD -AadTenantId 00000000-1111-2222-3333-444444444444 -AzureSubscriptionId 55555555-6666-7777-8888-999999999999
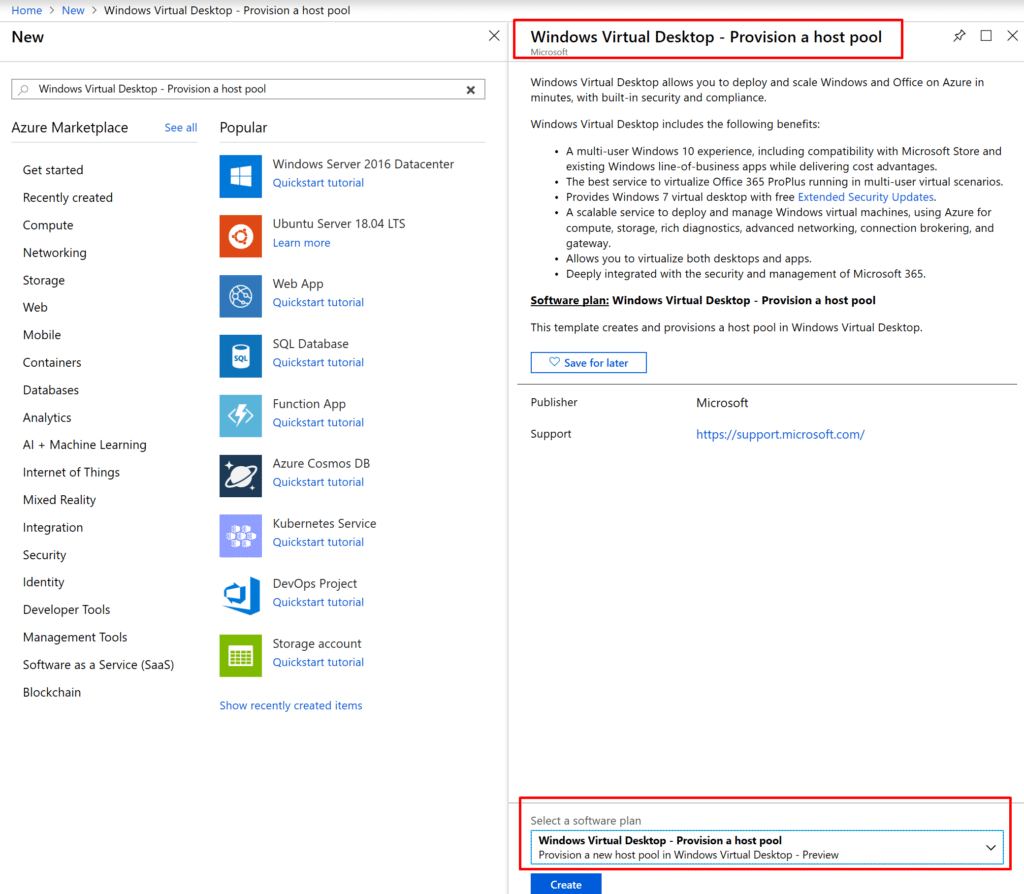
Provision a Windows Virtual Desktop Host Pool in the Azure Portal
- Create a new Azure resource at this link: https://portal.azure.com/#create/hub
- Search for Windows Virtual Desktop – Provision a host pool and select Create:
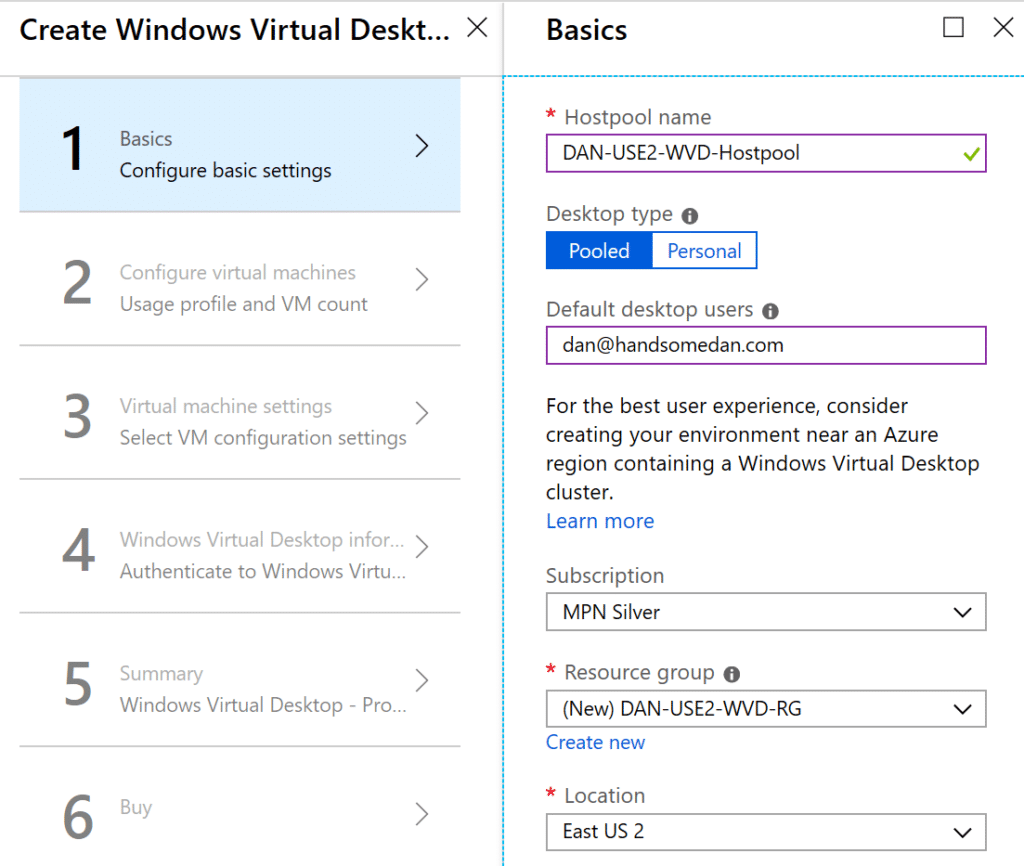
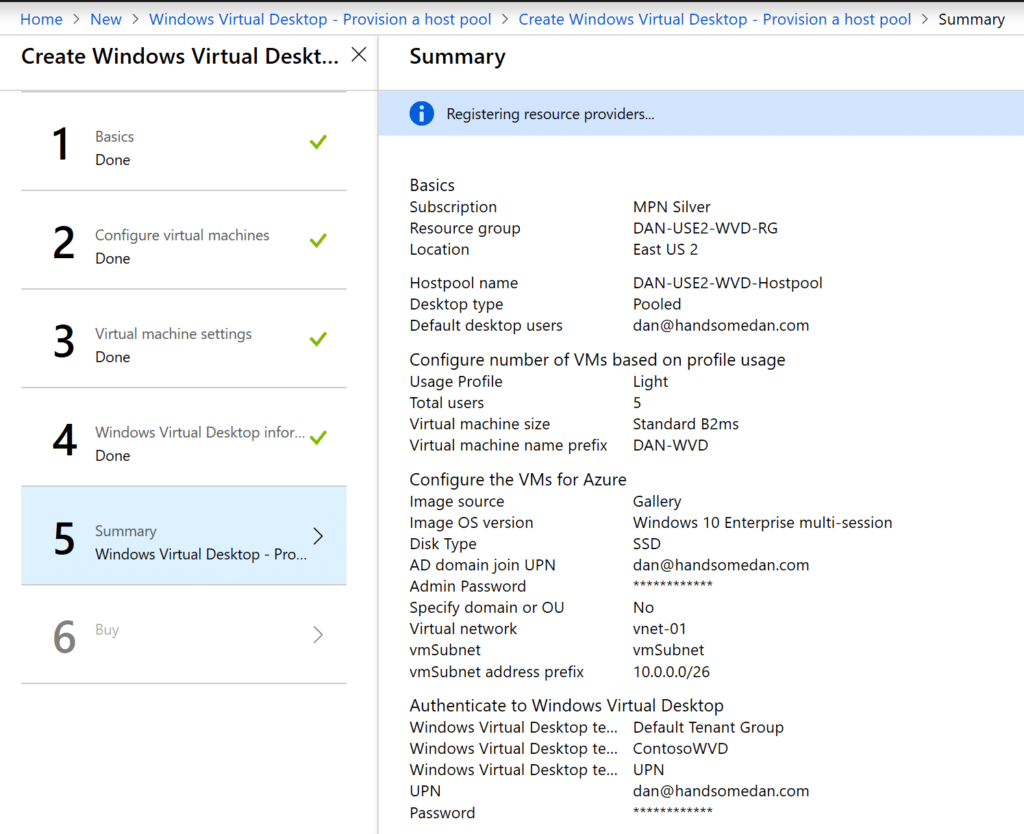
*Choose a name for the host pool and keep a note of it, as we’ll need it later
NOTE: Windows Virtual Desktop management is only available in East US 2 or the Central US during preview. Check a current list here:
https://azure.microsoft.com/en-us/global-infrastructure/services/?products=virtual-desktop
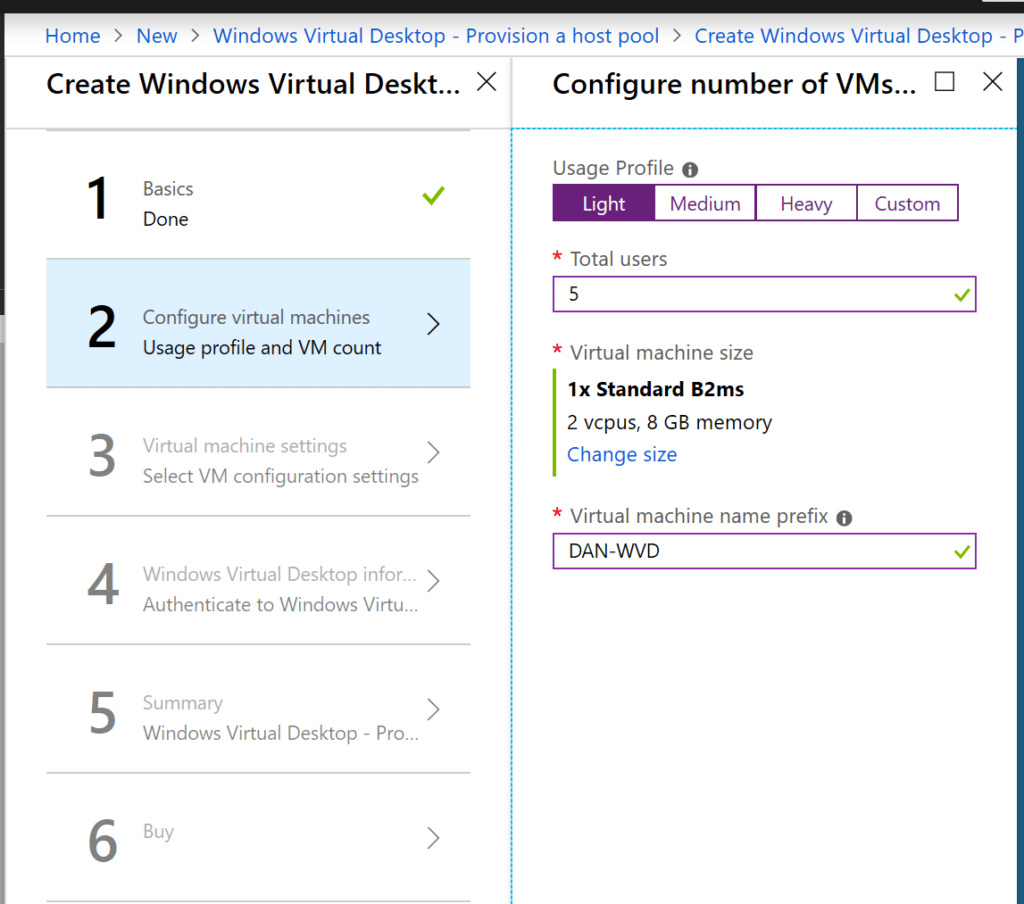
3. Don’t get in trouble with your boss—choose a small B series VM for testing. (If you get a validation error, choose a D-Series and resize the VM after creating it as needed.)
4. Everyone is so excited about Azure being the only cloud to offer a true multi-session Windows 10 Enterprise desktop, so let’s use that image:
Update: Make sure you use the new image for Windows 10 Enterprise multi-session with Office 365 ProPlus otherwise you will have to manually deploy Office 365 ProPlus to WVD.
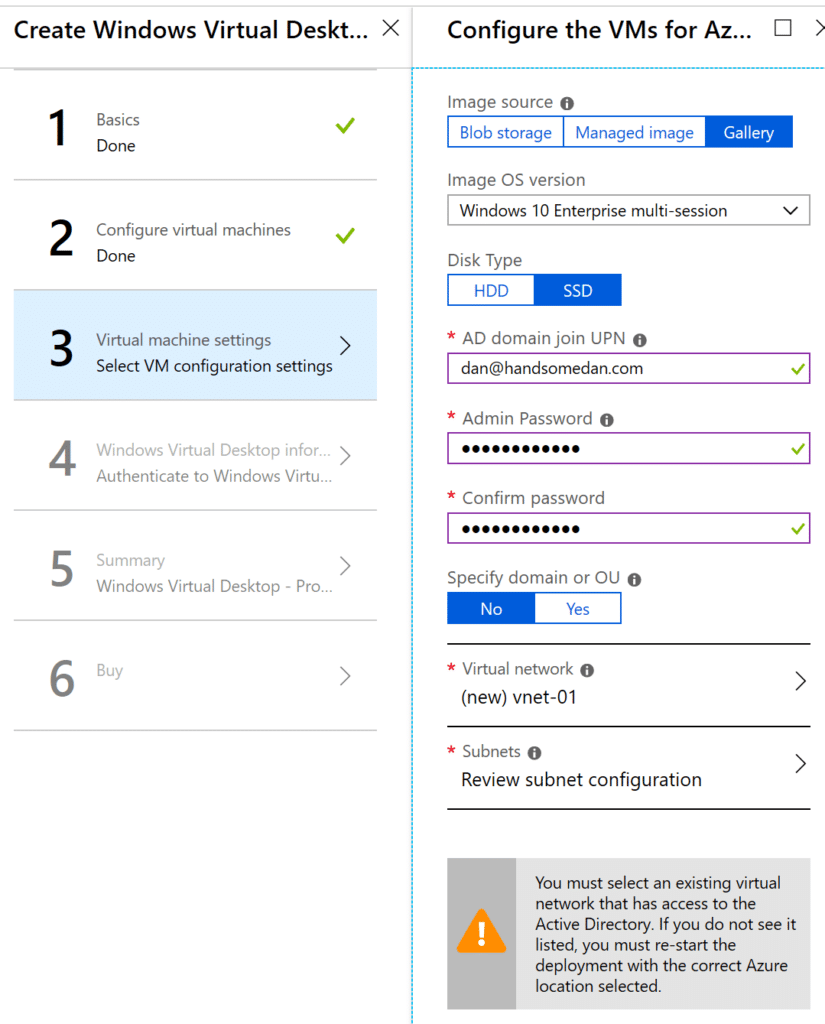
NOTE: Make sure you choose a network that has access to your AD environment
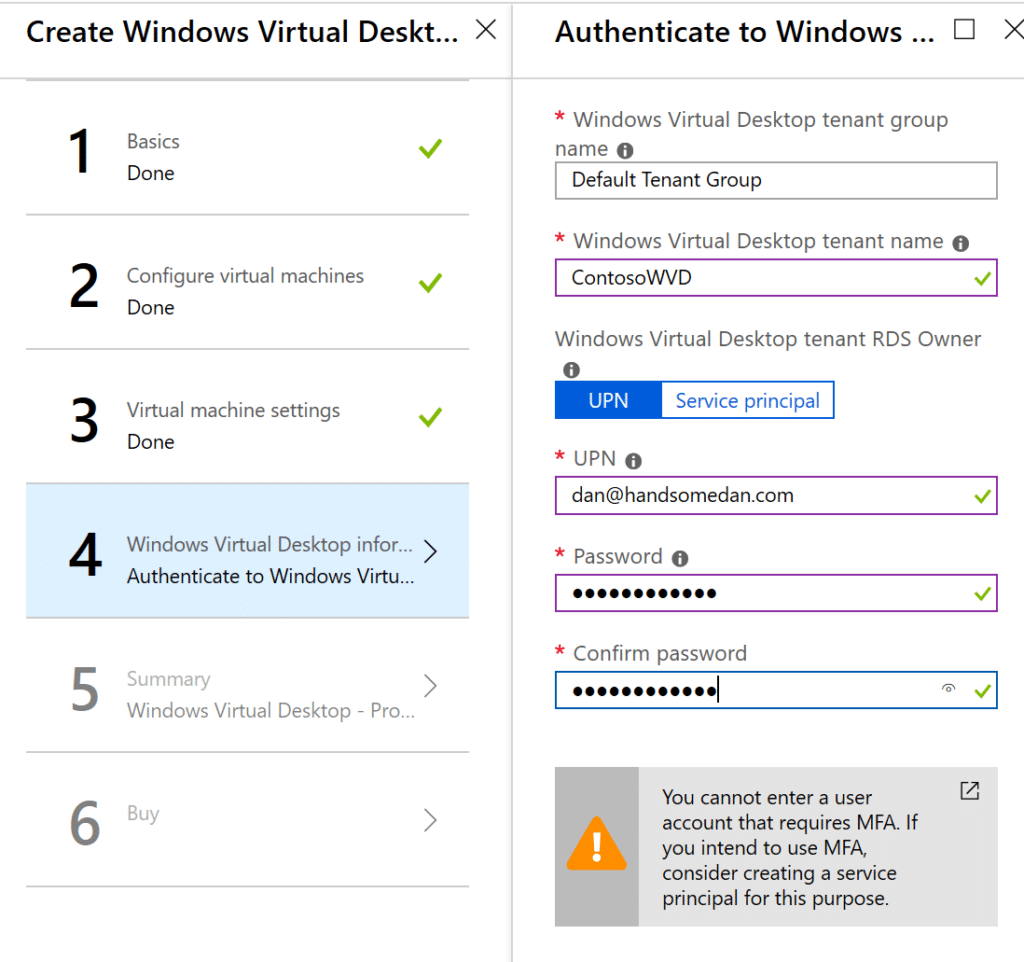
5. Specify the Windows Virtual Desktop Tenant Name that you created via PowerShell above and the AAD account that you used to create it:
6. Buy it!
Add Users to your Windows Virtual Desktop Host Pool
First, we’ll need to assign users to Enterprise Application in the Azure portal.
- Open the Enterprise Applications page: https://portal.azure.com/#blade/Microsoft_AAD_IAM/StartboardApplicationsMenuBlade/AllApps/menuId/
- Search for Windows Virtual Desktop Client and then select it.
- Navigate to Users and groups and then add your remote users. (Groups are supported here.)
- Or navigate to Properties and set User assignment required to No to allow all users to access.
Then open PowerShell again and run the following command for every user you want to add. (Groups support isn’t ready yet.)
Add-RdsAppGroupUser -TenantName ContosoWVD -HostPoolName "DAN-USE2-WVD-HostPool" -AppGroupName "Desktop Application Group" -UserPrincipalName jeff@handsomedan.com
You’re done! (Maybe.)
Update: I’ve had multiple people tell me they receive a DSC failure. If you get this error, you’ll also need to run through the PowerShell scripts on this page as well. These are the steps to follow:
# Generate a WVD registration token for your Host Pool
New-RdsRegistrationInfo -TenantName ContosoWVD  -HostPoolName "DAN-USE2-WVD-HostPool" -ExpirationHours 4 | Select-Object -ExpandProperty Token
- Login to the WVD session host (even though it failed, you can RDP in with your AD creds)
- Download and install the Windows Virtual Desktop Agent
- Enter your registration token generated in PowerShell into the installer
- Download and install the Windows Virtual Desktop Agent Bootloader
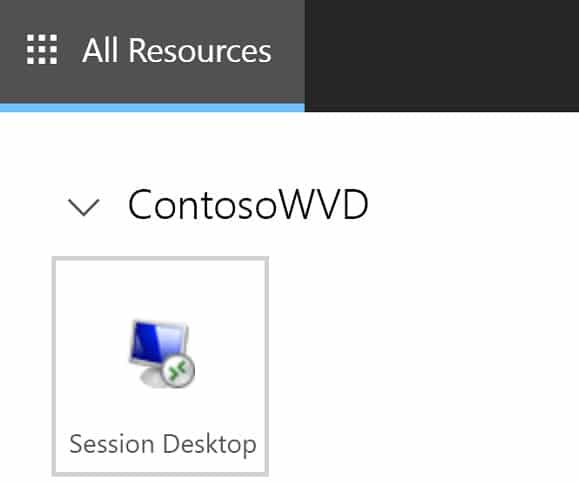
Connect to you Windows Virtual Desktop Environment
Access your WVD environment here:
https://rdweb.wvd.microsoft.com/webclient/index.html
You should see a web page with the following icon that will load the RDS session in the browser:
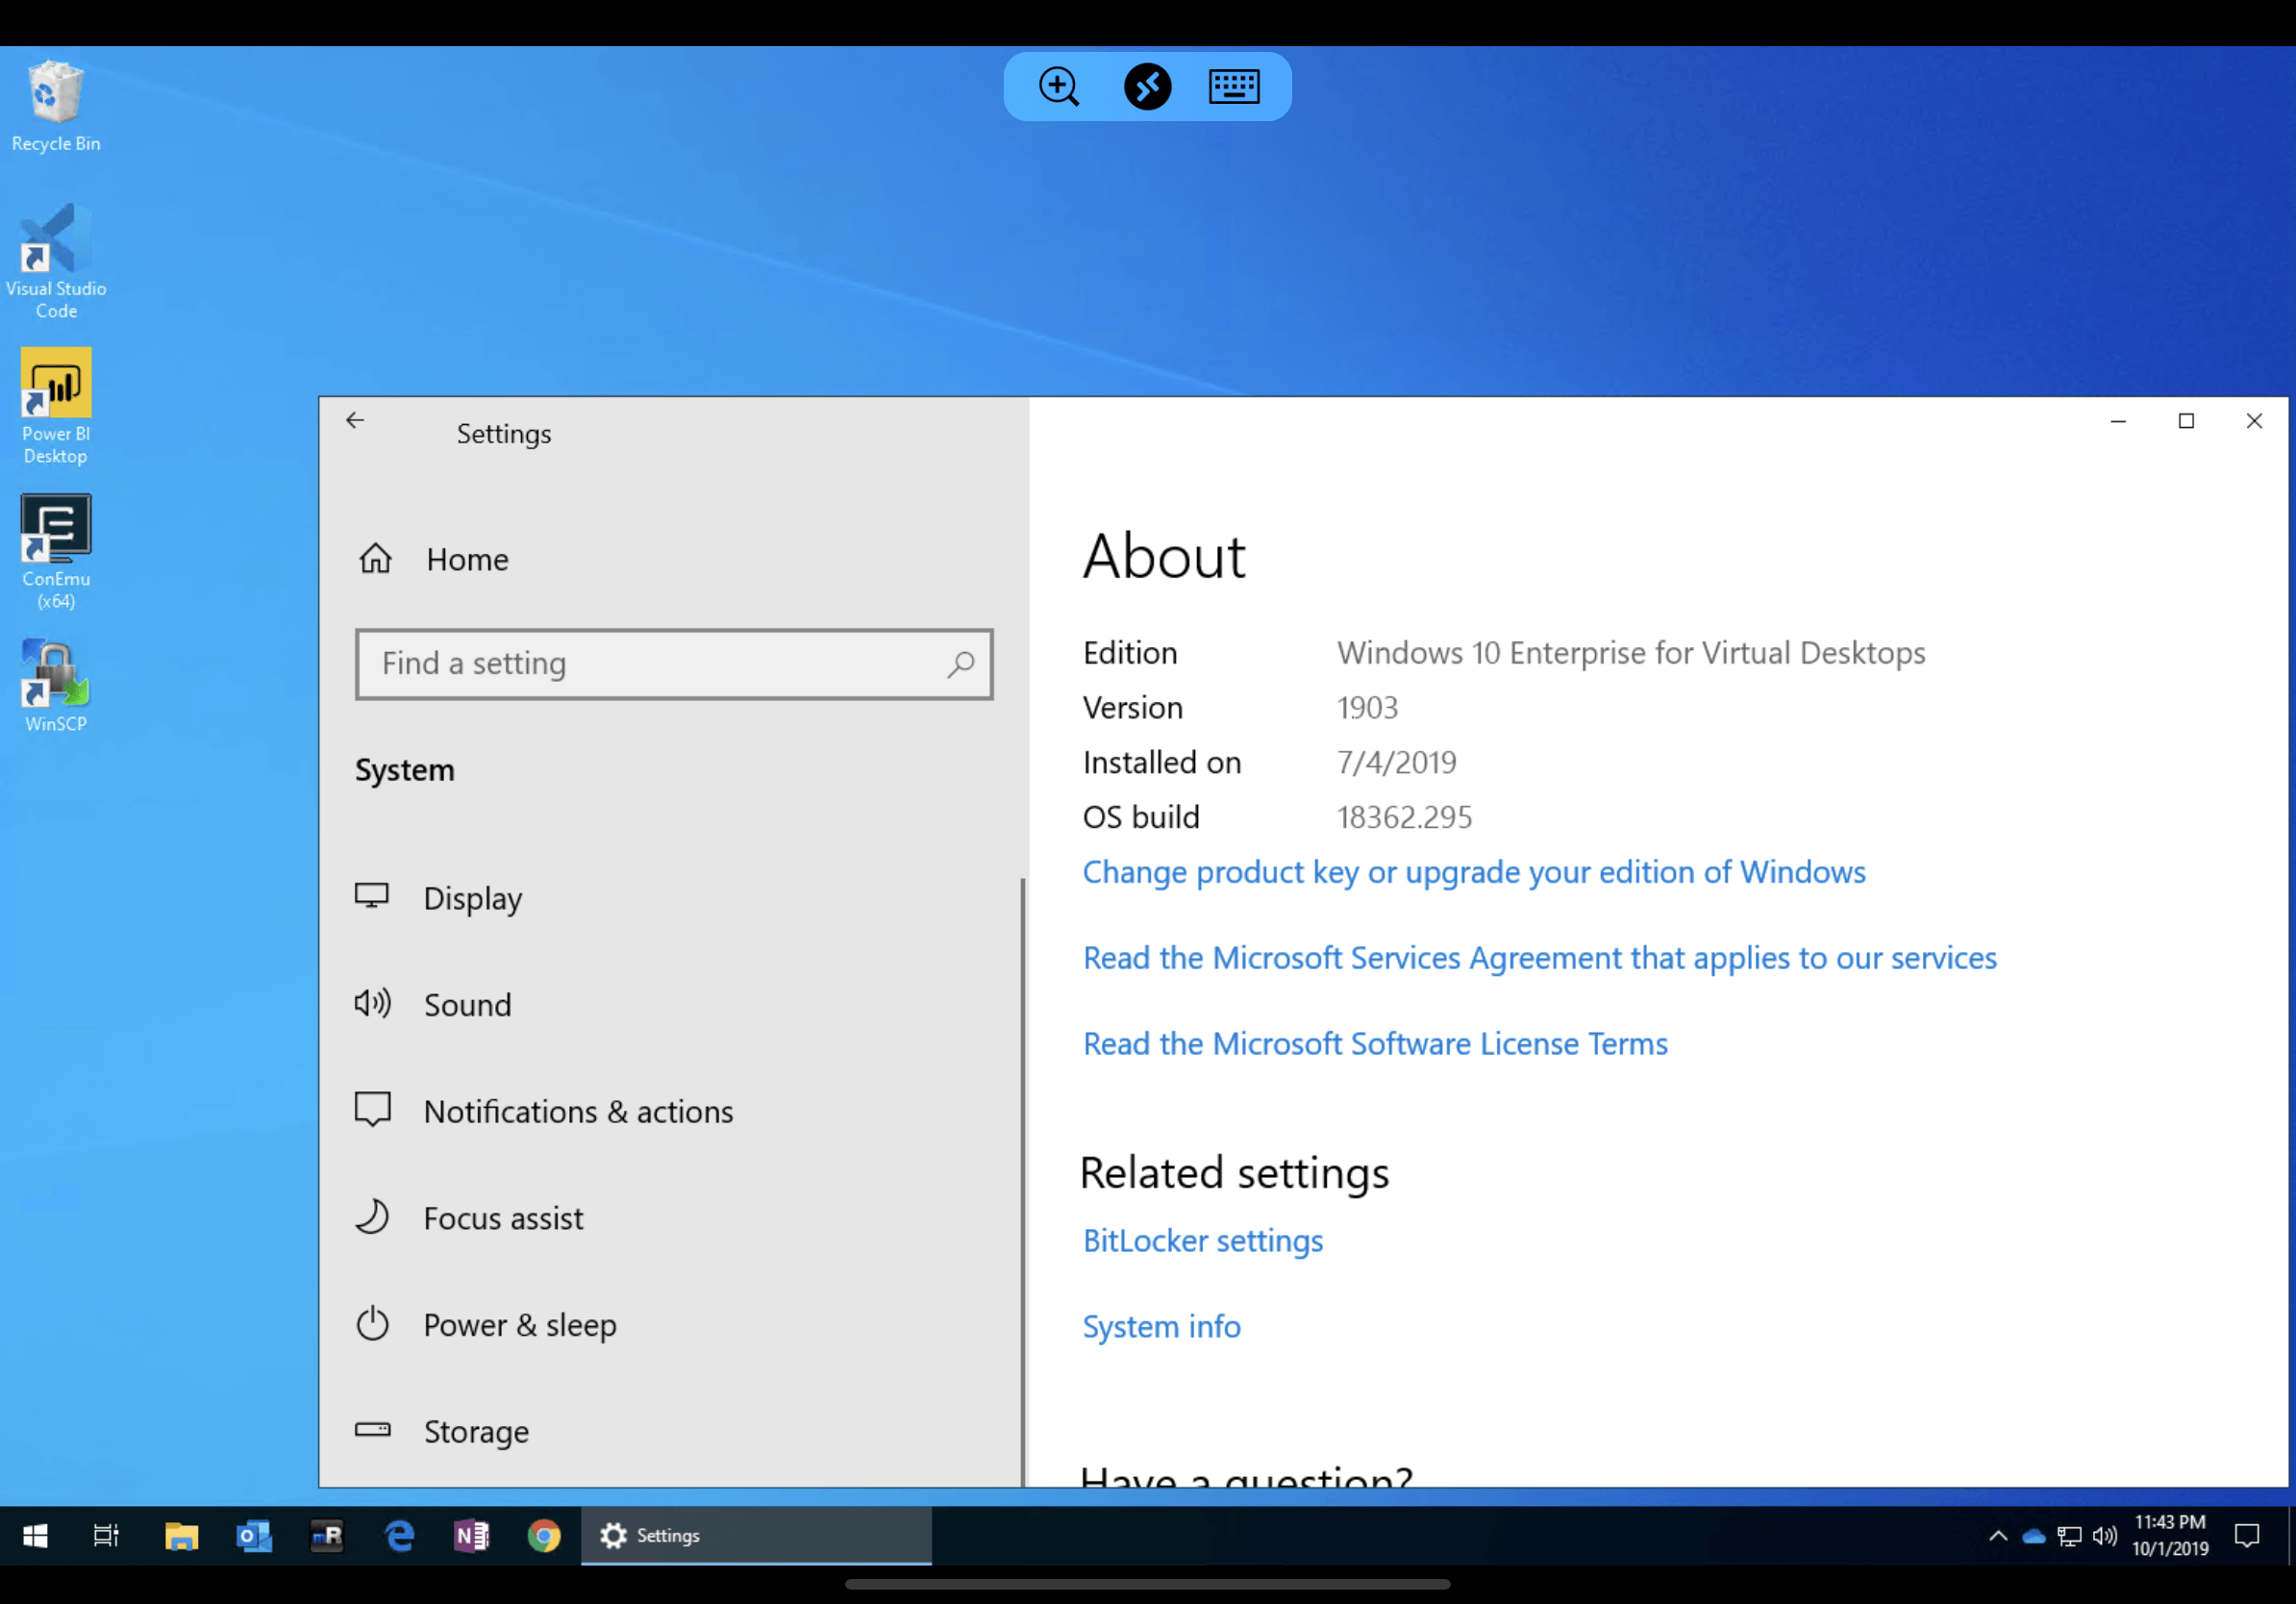
Using the desktop app, I was able to run three 4K monitors without any lag connecting to the East US2 Azure data center from San Diego, CA. That’s incredible!
Troubleshooting a Windows Virtual Desktop Deployment in Azure
I screwed up the first three times I deployed this today. Pro tip: RTFM.
Microsoft’s Windows Virtual Desktop guide is available here:
https://techcommunity.microsoft.com/t5/windows-it-pro-blog/getting-started-with-windows-virtual-desktop/ba-p/391054
I also had to RDP into the WVD Host Pool and run everything in this guide before I was able to connect:
https://docs.microsoft.com/en-us/azure/virtual-desktop/create-host-pools-powershell
Closing Thoughts on Windows Virtual Desktop
Once I read the entire deployment guide, I was able to deploy WVD in under an hour. Granted, I haven’t configured any auto-scaling rules yet, that is an incredibly short amount of time for a small business to setup a VDI environment.
Some points to consider:
- I deployed Azure Security Center on the WVD Host Pool VM to get telemetry to Microsoft Defender Advanced Threat Protection, Cloud App Security, and Azure Sentinel
- This is HUGE if you’re on a Microsoft 365 Business license, which doesn’t include those two products.
- WVD is still in preview, so I wouldn’t base your budget on this just yet.
- WVD does not support Intune management…yet.
- I just spent six months figuring out how to migrate anything in Group Policy over to Intune, and now I need to go back to Group Policy for management.
- Azure AD Join is not an option for WVD. The VM must connect to Active Directory.
- Windows 7 will receive free Extended Security Updates until January 2023 for Windows Virtual Desktop instances.
- If you’re testing WVD from outside of the United States, be aware that all WVD management is in the East US 2 data center during preview, so you will have data entering the US during preview.
- Make sure you use shared licensing activation to deploy Office 365 ProPlus
- It’s freaking AMAZING!
Overall, I am hugely impressed with the initial preview of Windows Virtual Desktop and I can’t wait to see what features Microsoft adds to the service over the next few months.
Share this
Step-by-Step Guide to Install FSLogix on WVD

Guide to Deploy Office 365 ProPlus in Windows Virtual Desktop
No Comments Yet
Let us know what you think