Last month, Microsoft announced that anyone with an active Office 365 subscription can configure Valimail for DMARC monitoring for free! Great! But what the heck does that mean? In simple terms, it means you can eliminate 40-70% of phishing and spoofing attacks on your domain, and you’re going to help make the Internet a safer place. But let’s take a step back and talk about two other protocols first: Sender Policy Framework (SPF) and DomainKeys Identified Mail (DKIM).
Sender Policy Framework (SPF)
SPF is a DNS based email authentication protocol where you specify which email servers are allowed to use your domain name to send email. In a nutshell, it’s DNS TXT record with a list of mail servers that you use. Here are a few examples of SPF records:
# SPF records exist at the root of your domain as a TXT record created at the root of the email domain.

# Here is a the default SPF record if you're using Office 365:
v=spf1 include:spf.protection.outlook.com -all

# If you're using Office 365 in Germany, the default looks like this:
v=spf1 include:spf.protection.outlook.de -all

#If you're using Gmail, this is your default value:
v=spf1 include:_spf.google.com ~all

# Salesforce uses the following default value:
v=spf1 include:_spf.salesforce.com ~all

# If you combine all the services above, it can look like this:
v=spf1 include:spf.protection.outlook.com include:spf.protection.outlook.com include:_spf.google.com include:_spf.google.com include:_spf.salesforce.com -all
SPF records can be prefixed with a mechanism to determine if an email server will fail the SPF record check if the record is not aligned (i.e., you’re using a subdomain):
“+” “Pass”
“-” “Fail”
“~” “Soft fail”
“?” “Neutral”
Addional examples of more elaborate SPF records can be seen at DmarcAnalyzer. Warning: if you do not set your SPF alignment correctly, third-party mailing services may fail SPF validation checks. Using a softfail or “relaxed” mode can lower your risk of blocking legitimate email.
SPF Flattening
SPF authentication failures typically occur for two reasons: an unauthorized server is using your domain name, or you exceeded the 10 DNS lookup threshold in your SPF record. An unauthorized server is easy to fix: just use Valimail to identify the server name and then adopt it into your SPF records. By itself, an SPF record doesn’t do anything unless DMARC is configured.
If you’re a larger organization, your marketing department, sales folks, strategic partners, and any number of other vendors could be using your domain name to send email as you. To resolve the 10 DNS lookup limit, you can use an SPF flattening service that will place the IP addresses of your partners into your SPF record to avoid the excessive DNS lookup failure. For small businesses, using AutoSPF’s free tier is a great option, and only costs $7/mo for larger organizations.
Here is an example of the InfusedInnovations.com flattened SPF record with a nested SPF value:
# TXT record for www.infusedinnovations.com

v=spf1 ip4:3.93.157.0/24 ip4:18.208.124.128/25 ip4:23.103.128.0/19 ip4:23.103.191.0/24 ip4:23.103.198.0/23 ip4:23.103.200.0/21 ip4:23.103.208.0/21 ip4:23.253.182.0/23 ip4:35.190.247.0/24 ip4:35.191.0.0/16 ip4:40.92.0.0/15 ip4:40.107.0.0/16 ip4:50.23.218.192/27 ip4:50.31.32.0/19 ip4:52.100.0.0/14 ip4:54.174.52.0/24 ip4:54.174.53.128/30 ip4:54.174.57.0/24 ip4:54.174.59.0/24 ip4:54.174.60.0/23 ip4:54.174.63.0/24 ip4:54.240.40.0/25 ip4:54.240.56.128/26 include:spf1.www.infusedinnovations.com -all

# TXT record for: spf1.www.infusedinnovations.com
v=spf1 ip4:54.240.63.0/25 ip4:64.4.22.64/26 ip4:64.233.160.0/19 ip4:65.55.88.0/24 ip4:65.55.169.0/24 ip4:66.102.0.0/20 ip4:66.249.80.0/20 ip4:69.72.32.0/20 ip4:72.14.192.0/18 ip4:74.125.0.0/16 ip4:94.245.120.64/26 ip4:96.46.150.192/27 ip4:104.47.0.0/17 ip4:104.130.96.0/28 ip4:104.130.122.0/23 ip4:108.177.8.0/21 ip4:108.177.96.0/19 ip4:130.211.0.0/22 ip4:134.170.140.0/24 ip4:141.193.32.0/23 ip4:146.20.112.0/26 ip4:146.20.113.0/24 ip4:146.20.191.0/24 include:spf2.www.infusedinnovations.com -all
Dmarcian will also help you flatten your SPF record for free, as long as you only need to do it once and not have it monitored.
For you knowledge hungry nerds out there, RFC7208 details the specifics of the protocol.
DomainKeys Identified Mail (DKIM)
DKIM affixes a digital signature, linked to a domain name, to each outgoing email message from your email server to be used to detect email spoofing and phishing attempts. Sounds complicated, but it’s another DNS record that takes 5 minutes to setup.
If you’re using Office 365, navigate to the threat policy blade in the Security & Compliance portal and click enable after creating the following DNS records for DKIM for your domain. By default, the DNS record should look similar to this for all tenants:
# CNAME record
# Host name:
    selector1._domainkey
# Points to:
    selector1-suffix-tld._domainkey.tenant.onmicrosoft.com

# CNAME record
# Host name:
    selector2._domainkey
# Points to:
    selector2-suffix-tld._domainkey.tenant.onmicrosoft.com

# For instance:
# Host name:
    selector2._domainkey
# Points to:
    selector2-secqur-com._domainkey.secqur.onmicrosoft.com
You can check your DKIM setting for free using a service like dmarcian or mxtoolbox. If you’re using Google Apps, check out this guide to setup DKIM for your domain.
For you gear heads, RFC 6376 details the inner workings of the protocol.
Domain-based Message Authentication, Reporting and Conformance (DMARC)
Now that we know how to specify approved mail servers with SPF, and sign outgoing emails with DKIM, we’re ready to implement DMARC to block emails that fail alignment check with either of those protocols. Domain-based Message Authentication, Reporting and Conformance (DMARC) is the widely-accepted open technical standard used to enforce email authentication. Let’s look at a couple of enforcement scenarios.
Scenario 1: SPF Failure
Let’s say you’re using Hubspot for marketing and you setup DKIM to sign outgoing email messages, but you forgot to add Hubspot to your SPF record. That means that Hubspot’s email servers are not on your approved list of senders. If your DMARC records is set to soft fail, the email will still be delivered.
Scenario 2: DKIM Failure
Imagine your junior systems admin setup a Linux box for alerting, and added the IP address to your SPF record, but doesn’t know how to enable DKIM on the server. Similar to the previous situation, if DMARC is configured for a soft failure, the email will still be delivered since it passed SPF alignment validation.
Scenario 3: SPF & DKIM Failure
If an email fails both SPF & DKIM alignment checks, your DMARC policy should be configured to either mark the message as spam, or block it entirely.
Sample DMARC Record
# A basic DMARC Record that allows all mail through, even if both SPF/DKIM fail:
v=DMARC1; pct=100; p=none

# Microsoft's DMARC record indicating that DMARC failures should be rejected:
v=DMARC1; p=reject; pct=100; rua=mailto:d@rua.agari.com; ruf=mailto:d@ruf.agari.com; fo=1
You can check your DMARC record for free using dmarcian or mxtoolbox as well.
Using the RUA and RUF parameters allows you to monitor DMARC failures and adopt new legitimate services. This is where Valimail comes into the picture, as Microsoft has arranged a partnership for all Office 365 tenants to take advantage of free DMARC monitoring services. This is a huge value, since monthly monitoring services could easily be over $100/mo from other vendors.
Timeline for Configuring DMARC Rejections with Valimail
If you enable DMARC right now, chances are you’re going to block legitimate email. Depending on the size of your organization, we suggest a timeline similar to the following:
- Monitor DMARC failures for 1-6 months until all identified senders have SPF and DKIM records in place.
- Enable soft failures to allow senders to fail either SPF or DKIM, but not both for another 1-6 months. Messages failing both SPF and DKIM will be quarantined by the receiving email server.
- Enforce hard failures if both SPF and DKIM records are not in place. The receiving email server will block messages that fail DMARC.
Configure Valimail for DMARC Monitoring with Office 365
Now that you understand how DMARC works, let’s make it easy on ourselves and setup Valimail to manage our DMARC record and monitoring.
Step 1: sign up for Valimail here and wait for approval to their service: https://go.valimail.com/microsoft.html
Step 2: delegate your DMARC record to Valimail by creating the following public NS record:
# NS (Nameserver) Record
# Name
    _dmarc
# Value
    ns.vali.email
# Alternate method if you want use a TXT record instead
# Name
    _dmarc
# Value
    v=DMARC1; p=none; rua=mailto:dmarc_agg@vali.email;
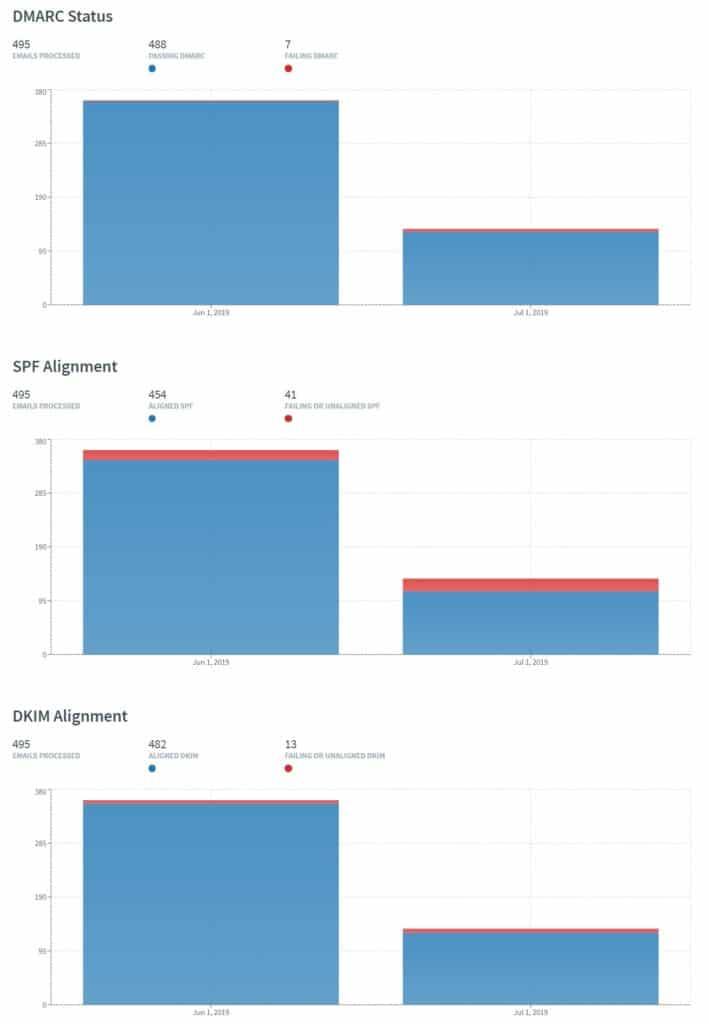
That’s it! You just setup DMARC monitoring and created you DMARC record. In a few days, you’ll be able to view your DMARC reports to identify services that are sending email with our domain name.
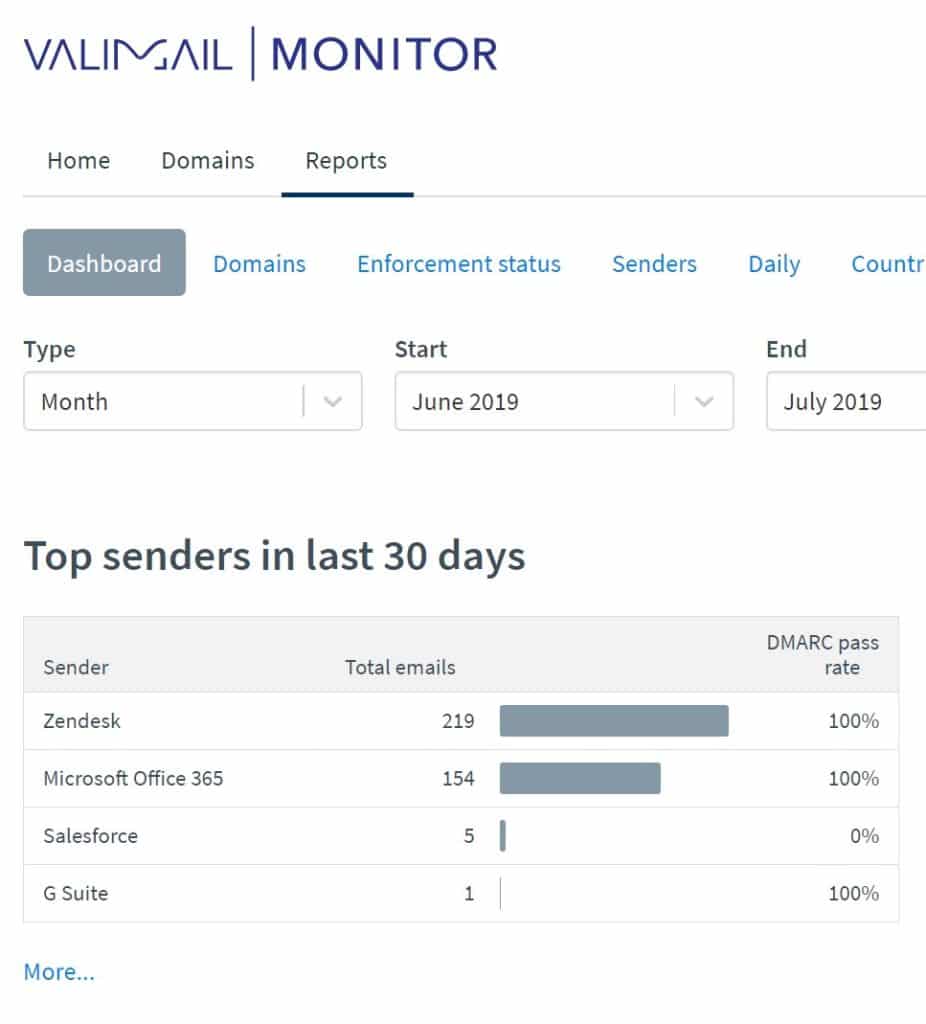
You will also gain visibility into SPF and DKIM failures as well:
Enforcing a DMARC Policy with Valimail
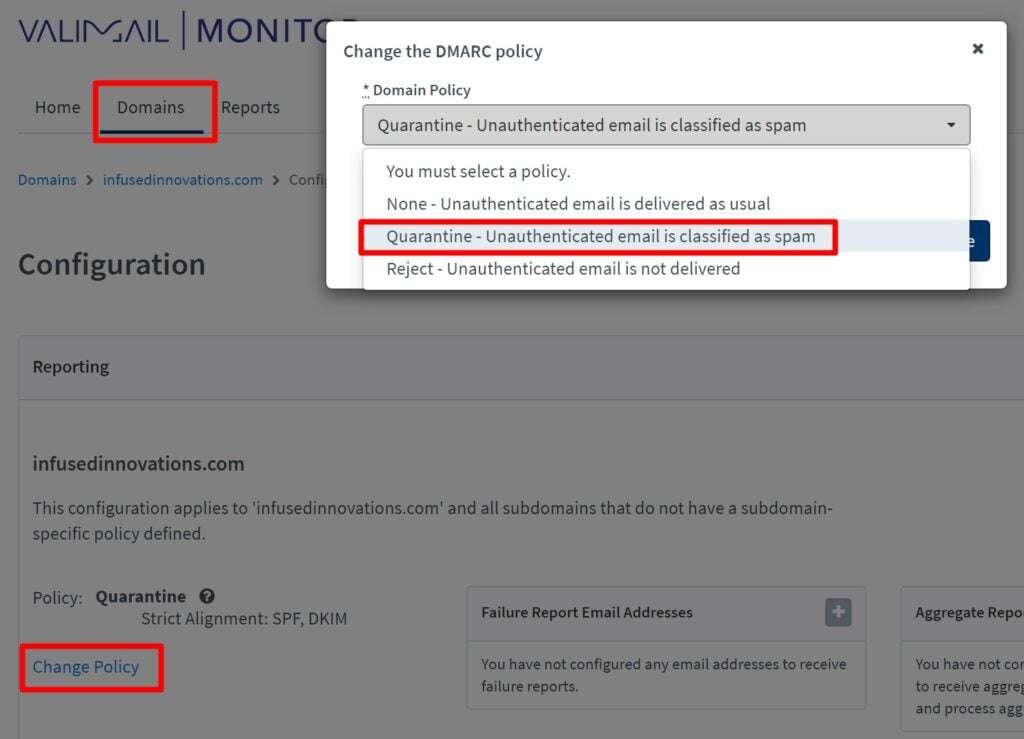
After you have monitored DMARC failures for at least a month and have adopted all legitimate services, you can use the Valimail portal to configure your DMARC policy without having to worry about generating the DMARC record yourself. Simply click into Domains > Change Policy and select Quarantine to start flagging failures as spam. (After you have no complaints for another 1-2 months, you can bump the policy up to reject.)
Configuring Azure SSO with Valimail
I hate passwords. I use Windows Hello and SAML for everything. Valimail claims to only work with Okta and OneLogin, but I figured out how to get it to work with Azure SSO.
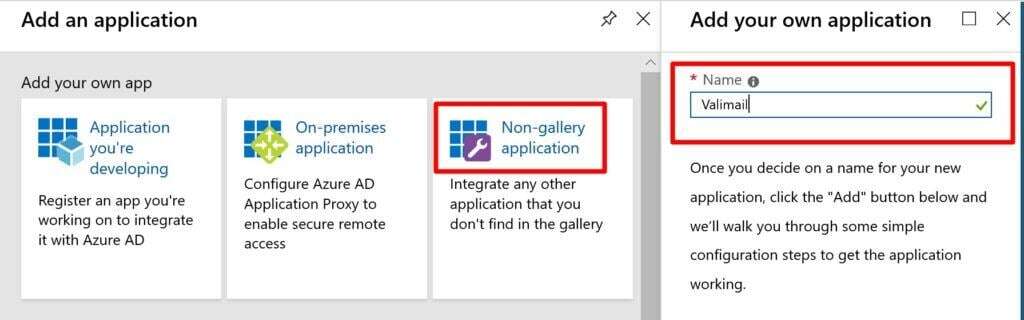
Create an Enterprise Application in Azure Active Directory
- Open the Enterprise Applications blade in the Azure Portal
- Select New Application
- Select Non-Gallery Application
- Name it: Valimail for DMARC and click Add
Configure Valimail for DMARC with SAML Authentication in Azure AD
First, click users and groups. Then add anyone that you want to have access to Valimail.
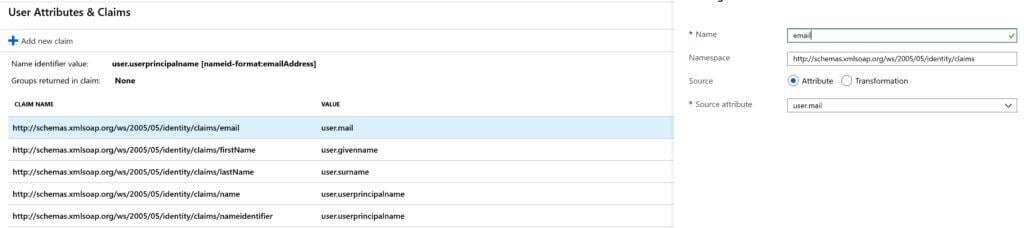
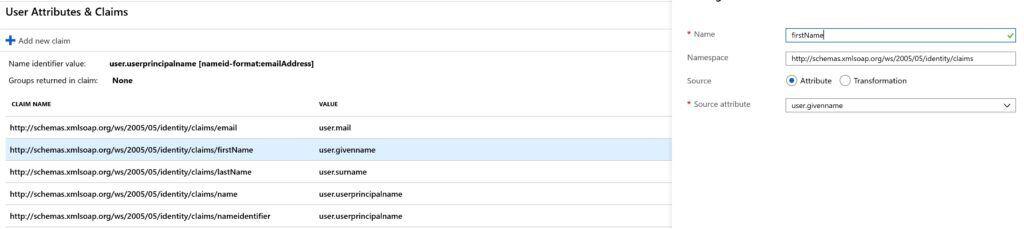
Next, click Single sign-on and modify the following fields:
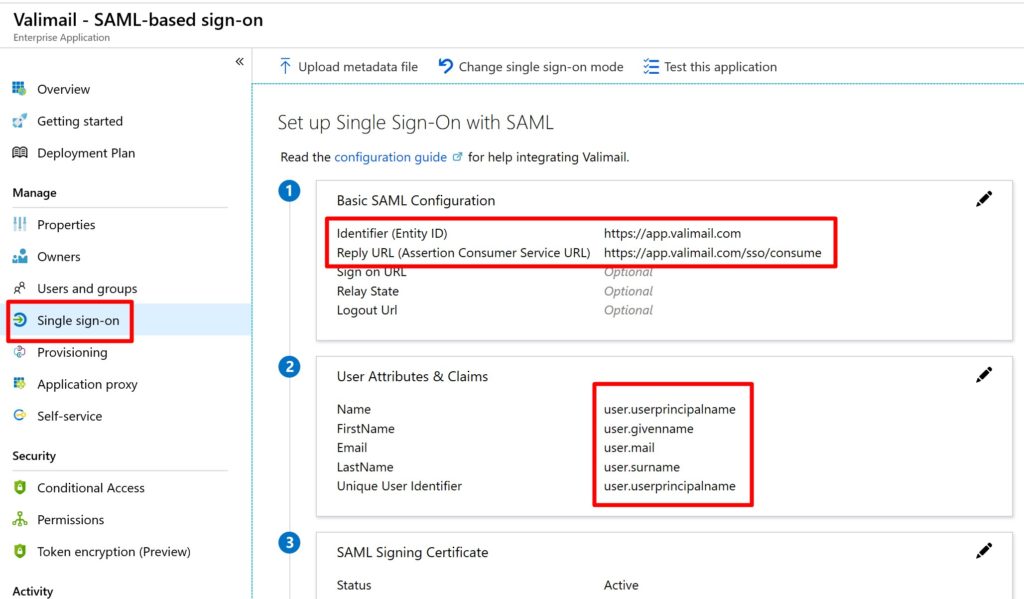
# Block 1
Entity ID:
https://app.valimail.com

Reply URL:
https://app.valimail.com/sso/consume

# Block 2
# Modify the SAML attributes as follows (screenshots below):
Email        user.email
FirstName    user.firstName
LastName     user.lastName
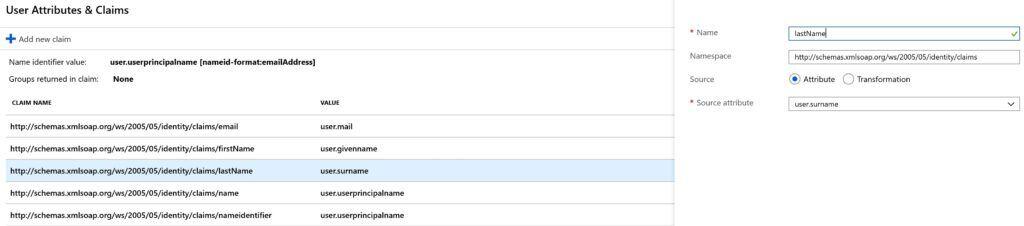
Last Name Field
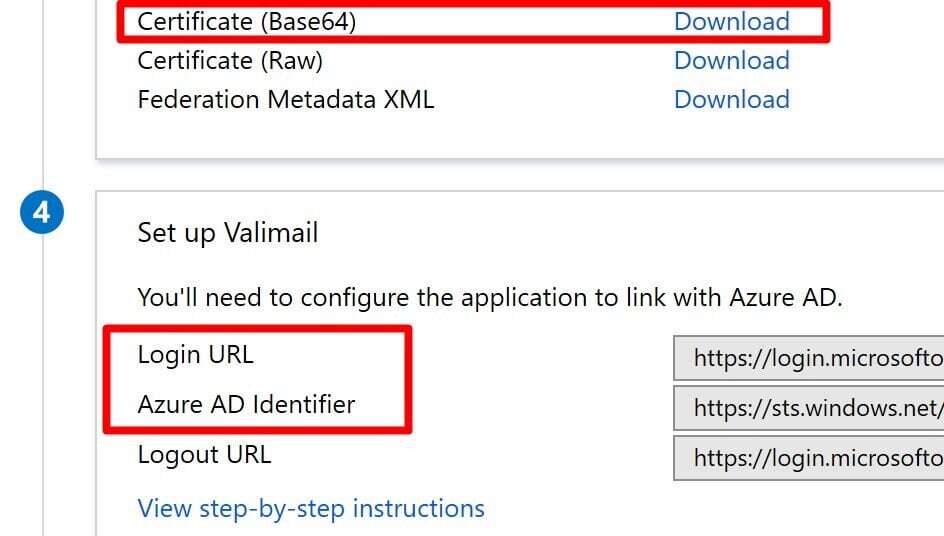
Next, click the download link next to Certificate (Base64) in section 3.
Finally, in block 4, copy the Login URL and Azure AD Identifier URLs.
Configure Valimail for DMARC with Azure SSO
- Navigate to: https://app.valimail.com/sso_config/edit
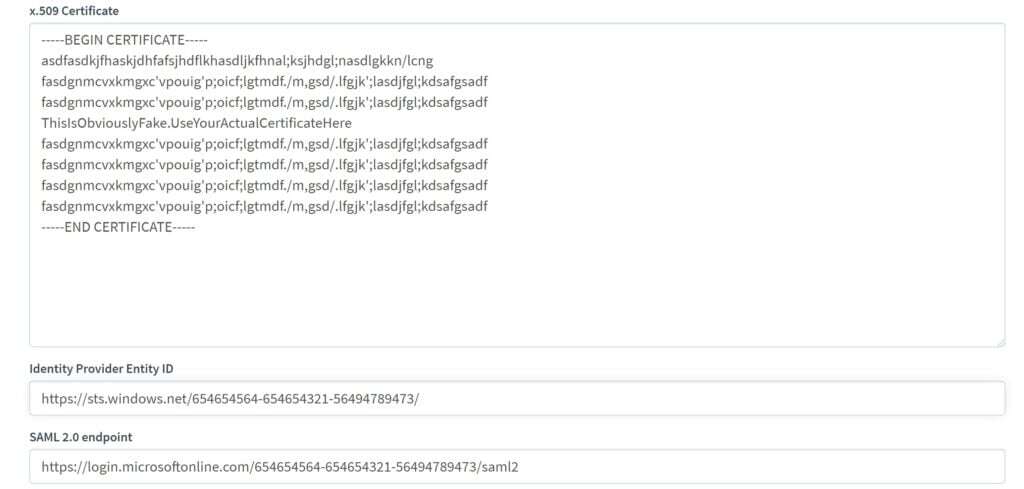
- Open the Block 3: Certificate (Base64) file in notepad and paste it into the x.509 Certificate field
- Copy the Block 4: Azure AD Identifier into the Identity Provider Entity ID field
- Copy the Blcok 4: Login URL into the SAML 2.0 endpoint field
Your configuration should look similar to the following:
Creating users in Valimail is a manual process, and your Azure AD users will not be automatically populated. You’ll have to manually provision any users in the Valimail portal with their corresponding Azure AD email address.
Granular Server IP Reporting with DMARCIAN
Some common feedback we receive about Valimail is that it’s great at identifying services to adopt into you SPF and DKIM records. However, if those services continue to fail DMARC, Valimail doesn’t offer a detailed reason why. Fortunately, Valimail can forward DMARC failure reports to other services.
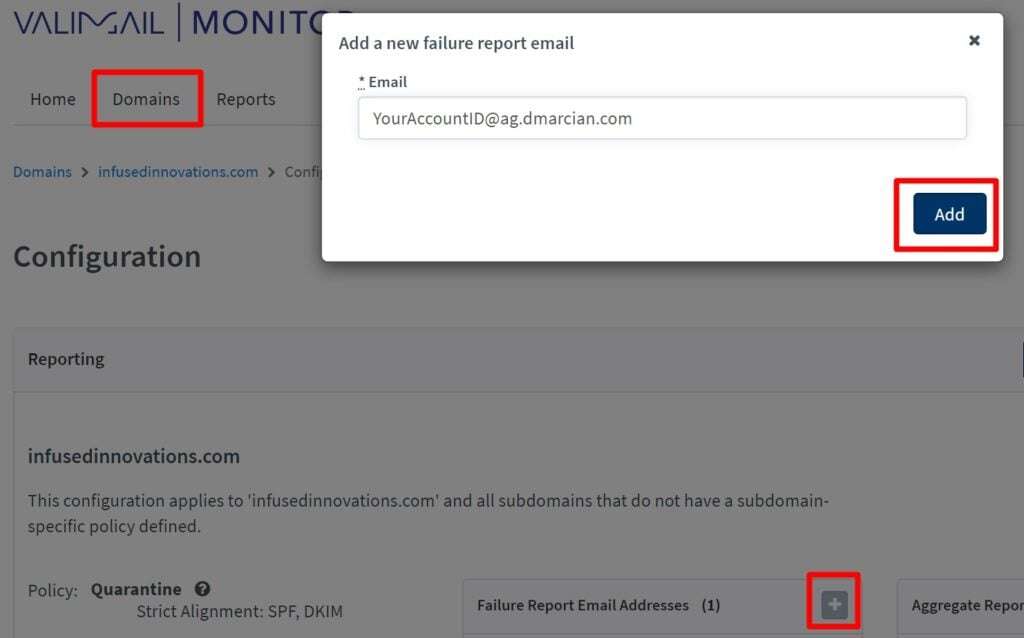
Microsoft previously endorsed dmarcian.com in all of their SPF/DKIM/DMARC literature, which still offers a free DMARC monitoring service as well. You can register for a free DMARCIAN account. Once you’re in the DMARCIAN portal, click Add DMARC to display the rua= email address for your account.
Back in the Valimail portal, navigate to your domain, and click the + symbol next to Failure Report Emal Addresses. Then paste in the email address from rua= value that you copied from DMARCIAN.
After a few days, you’ll be able to login to DMARCIAN and view granular server IP address failures in their portal here:
https://us.dmarcian.com/detail-viewer/ (US customers)

Most failures will be the result of an unaligned SPF or DKIM record for a sub-domain of a service that you’ve adopted.
Note: DMARCIAN is only free for personal use and if your 30 day mail volume is less than 10,000 emails. Postmark is another free service that will include server IP addresses in their failure reports and is not restricted to personal use: https://dmarc.postmarkapp.com/
Closing Thoughts on How to Configure Valimail for DMARC Monitoring with Office 365
Do it! Right now! (Fine, submit a change control request first, and then do it.) If you’re nervous about making changes to your DNS records, I will configure Valimail DMARC monitoring for free and review your Microsoft 365 licensing. (If you assign me as your Microsoft Partner of Record. There is no cost to your for doing this.)
For most organizations, I prefer Valimail over DMARCIAN because it supports multiple users with Azure SSO on their free-tier, and it will monitor unlimited emails. However, if you’re having difficulty adopting services, then DMARCIAN or Postmark does offer more granular reporting and may be worth signing up for a trial to help diagnose failures.
Don’t subject your users to unnecessary phishing and spoofing campaigns. Everything in this post is free with your current Office 365 subscription. There is no excuse not to make the Internet a safer place for everyone by authenticating your email.
Share this
Step-by-Step Guide to Deploy Windows Virtual Desktop in Azure
Step-by-Step Guide to Install FSLogix on WVD

No Comments Yet
Let us know what you think